Installing Docker
For Mac and Windows there are a few different options for installing the Community Edition. The modern way to install Docker is to use Docker for Mac (https://www.docker.com/docker-mac) or Docker for Windows (https://www.docker.com/docker-windows), respectively. The installs include the Docker platform, command-line, compose, and notary tools. An advantage of this approach is that it uses the native platform virtualization for better resource utilization. For Windows, this provides the additional benefit of being able to run Windows containers in addition to Linux containers, but not at the same time.
Note: Docker for Windows requires Windows 10 Professional or Enterprise 64-bit.
The alternative means of installing Docker on Mac and Windows is to use Docker Toolbox (https://www.docker.com/products/docker-toolbox). It includes the Docker platform, command-line (including Docker Machine), compose, Kitematic, and VirtualBox. The advantage of Docker Toolbox is that it runs on older versions of Windows and makes simulating some clustered scenarios easier. A downside is that it runs a Linux virtual machine in Virtual Box, which uses additional resources and means each virtual machine must be referenced using a distinct IP address instead of localhost.
For Linux, each distribution has a unique way of installing Docker, so it is recommended you visit https://docs.docker.com/engine/installation/ for specific installation instructions.
Optionally on Linux you can install Docker-Machine as root; to do so, execute the following:
curl -L https://github.com/docker/machine/releases/download/v0.12.2/docker-machine-`uname -s`-`uname -m` >/tmp/docker-machine && chmod +x /tmp/docker-machine && sudo cp /tmp/docker-machine /usr/local/bin/docker-machine
Running a Container
With Docker installed, you can begin running containers from the command-line. If you don’t already have the image you want to run, Docker will automatically pull or download the image necessary to build the container from Docker Hub and run it.
To run the simple hello-world container to make sure everything is configured properly, run the following commands:
docker run --rm hello-world
After downloading the images and running the container, this command prints a “Hello from Docker!” message to standard output explaining all the steps that took place to display the message. Using the --rm option will also automatically remove the container and reclaim the disk space.
Typical Local Workflow
Docker has a typical workflow that enables you to create images, pull images, publish images, and run containers.
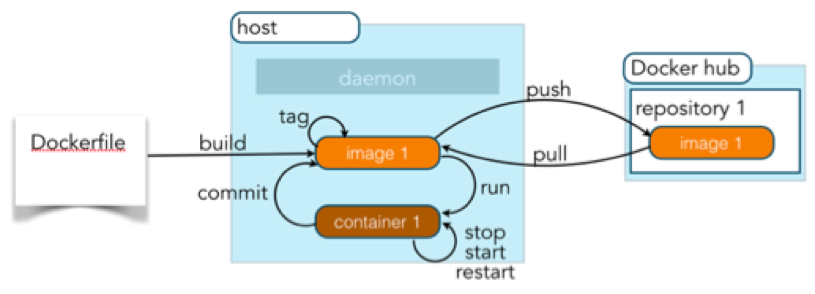
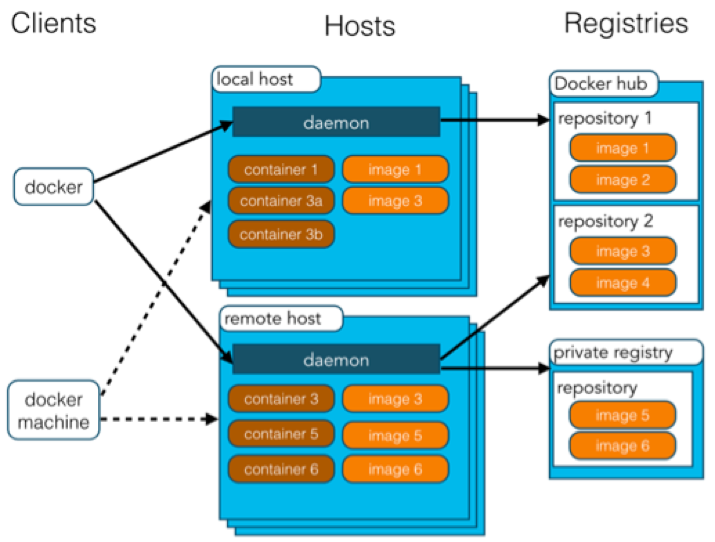
The typical Docker workflow involves building an image from a Dockerfile, which has instructions on how to configure a container or pull an image from a Docker Registry such as Docker Hub. With the image in your Docker environment, you can run the image, which creates a container as a runtime environment with the operating systems, software, and configurations described by the image. For example, your result could be a container on the Debian operating system running a version of MySQL 5.5, which creates a specific database with users and tables required by your web application. These runnable containers can be started and stopped like starting and stopping a virtual machine or computer. If manual configurations or software installations are made, a container can then be committed to make a new image that can be later used to create containers from it. Finally, when you want to share an image with your team or the world, you can push your images to a Docker registry.
Pull Image From Docker Registry
The easiest way to get an image is to visit https://hub.docker.com and find an already prepared image to build a container from. There are many certified official accounts for common software such as MySQL, Node.js, Java, Nginx, or WordPress, but there are also hundreds of thousands of images created by ordinary people as well. If you find an image you want, such as mysql, execute the pull command to download the image.
docker pull mysql
If you don’t already have the image locally, Docker will download the most current version of that image from Docker Hub and cache the image locally. If you don’t want the current image and instead want a specific version, you can also use a tag to identified the desired version.
docker pull mysql:8.0.2
If you know you will want to run the image immediately after pulling it, you can save a step by just using the run command and it will automatically pull it in the background.
Building Image From a Dockerfile
If you can’t find what you need or don’t trust the source of an image you find on Docker Hub, you can always create your own images by creating a Dockerfile. Dockerfiles contain instructions for inheriting from an existing image, where you can then add software or customize configurations.
The following is a simple example of what you might find in a file named Dockerfile:
FROM mysql:5.5.45
RUN echo America/New_York | tee /etc/timezone && dpkg-reconfigure --frontend noninteractive tzdata
This Dockerfile example shows that the image created will inherit from the certified mysql repository (specifically the 5.5.45 version of MySQL). It then runs a Linux command to update the time zone to Eastern Time.
More details on creating a Dockerfile will be provided later.
To build this image from the directory containing the Dockerfile, run the following command:
docker build .
This command will create an unnamed image. You can see it by running the command to list images.
docker images
This displays all the locally cached images, including the ones created using the build command.
REPOSITORY TAG IMAGE ID VIRTUAL SIZE
<none> <none> 4b9b8b27fb42 214.4 MB
mysql 8.0.2 0da0b10c6fd8 213.5 MB
As you can see, the build command created an image with a repository name and tag name of <none>. This tends not to be very helpful, so you can use a –t option to name the image for easier usage:
docker build –t est-mysql .
Listing the images again you can see the image is much clearer.
REPOSITORY TAG IMAGE ID VIRTUAL SIZE
est-mysql latest 4b9b8b27fb42 214.4 MB
mysql 8.0.2 0da0b10c6fd8 213.5 MB
There is an alternative option to creating a custom image besides writing a Dockerfile. You can run an existing image with bash access, then customize the image manually by installing software or changing configurations. When complete, you can run the docker commit command to create an image of the running container. This is not considered a best practice since it is not repeatable or self-documenting, unlike the Dockerfile method.
Running an Image
To run a Docker image, you just need to use the docker run command followed by a local image name or one found in Docker Hub. Usually, a Docker image will require some additional configurations. This is commonly done using environment variables, which can be specified with the -e option. For long running process like daemons you also need to use a –d option. To start the est-mysql image, you would run the following command to configure the MySQL root user’s password and a new database, as documented in the Docker Hub mysql repository documentation:
docker run -d -e MYSQL_ROOT_PASSWORD=root+1 -e MYSQL_DATABASE=mydb est-mysql
To see the running container, you can use the Docker ps command:
docker ps
The ps command lists all the running processes, the image name they were created from, the command that was run, any ports that software are listening on, and the name of the container.
CONTAINER ID IMAGE COMMAND PORTS NAMES
30645f307114 est-mysql "/entrypoint.sh mysql" 3306/tcp serene_brahmagupta
As you can see from the running processes above, the name of the container is serene_brahmagupta. This is an auto-generated name and may be challenging to maintain. So, it is considered a best practice to explicitly name the container using the --name option to provide your name at container start up:
docker run --name my-est-mysql -d -e MYSQL_ROOT_PASSWORD=root+1 -e MYSQL_DATABASE=mydb est-mysql
You will notice from the ps output that the container is listening to port 3306, but that does not mean you can use the mysql command line or MySQL Workbench locally to interact with the database, as that port is only accessible in the secure Docker environment in which it was launched. To make it available outside that environment, you must map ports using the –p option.
docker run --name my-est-mysql -d -e MYSQL_ROOT_PASSWORD=root+1 -e MYSQL_DATABASE=mydb -p 3306:3306 -d est-mysql
Now mysql is listening on a port that you can connect to. But you still must know what the IP address is to connect. If you are using Docker for Mac or Windows or Linux it is just localhost. To determine the IP address for Docker Toolbox, you can use the docker-machine ip command to figure it out.
docker-machine ip default
Using default as the machine name, which is the default machine installed with the Docker Toolbox, you will receive the IP address of the machine hosting your docker container.
With the IP address, you can now connect to mysql using your local mysql command line.
mysql -h 192.168.99.100 -u root -proot+1
Stopping and Starting Containers
Now that you have a Docker container running, you can stop it by using the Docker stop command and the container name:
docker stop my-est-mysql
The entire state of the container is written to disk, so if you want to run it again in the state it was in when you shut it down, you can use the start command:
docker start my-est-mysql
Networking Containers
A common use case is having applications in one container talking to services in another container, such as a web application talking to a database. You can simulate this by using the mysql command-line in one container talking to a MySQL database in another container represented in the figure below.
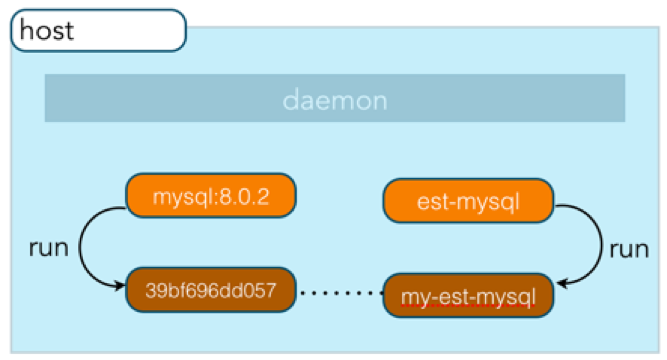
Docker by default automatically creates 3 networks for you. You can see these and any other user-defined networks you create by using the following command:
docker network ls
To enable the containers to talk to each other, you will want to create a new custom network. This will also include an internal DNS server so the IP addresses can be resolved to their container names. To create a new network named mysql-network use the following command:
docker network create mysql-network
If you want to add containers to that network like the already running my-est-mysql container you can connect them to the network by running the following network connect command:
docker network connect mysql-network my-est-mysql
Or when you start up a container, you can pass the network name with the --network option like:
docker run --rm --network mysql-network -it mysql:8.0.2 bash
In the example above, you start a new MySQL container that is automatically removed and using the it option it will start an interactive terminal in the container. The network option adds it to the mysql-network. bash is the application that runs when this container starts up and overrides the default start up behavior.
Now within the newly started container, you can connect to the MySQL database running in my-est-mysql container by simply running the following command, where -h is the host using the name of the container.
mysql -h my-est-mysql -u root -p
Mapping Volumes
Another common use case is to share a directory or directories between the running container and the host machine. This is commonly done when the container contains a database and the data files want to be persisted and backed up from the host machine or during development when a developer wants to use their IDE on the host machine but run their code in a fully configured container. This is accomplished by using the v option to map the host directory to the internal directory.
docker run --name my-est-mysql -d -v /my/host/datadir:/var/lib/msyql -e MYSQL_ROOT_PASSWORD=root+1 -e MYSQL_DATABASE=mydb -p 3306:3306 -d est-mysql
Tagging an Image
Now that you have an image that you have run and validated, it is a good idea to tag it with a username, image name, and version number before pushing it to a repository. You can accomplish this by using the Docker tag command:
docker tag est-mysql javajudd/est-mysql:1.0
Push Image to Repository
Finally, you are ready to push your image to Docker Hub for the world to use or your team to use via a private repository. First, if you haven’t done so already, you will need to go to https://hub.docker.com/ to create a free account. Next you need to login using the docker login command.
docker login
When prompted, input the username, password, and email address you registered with.
Now push your image using the push command, specifying your username, image name, and version number.
docker push javajudd/est-mysql:1.0
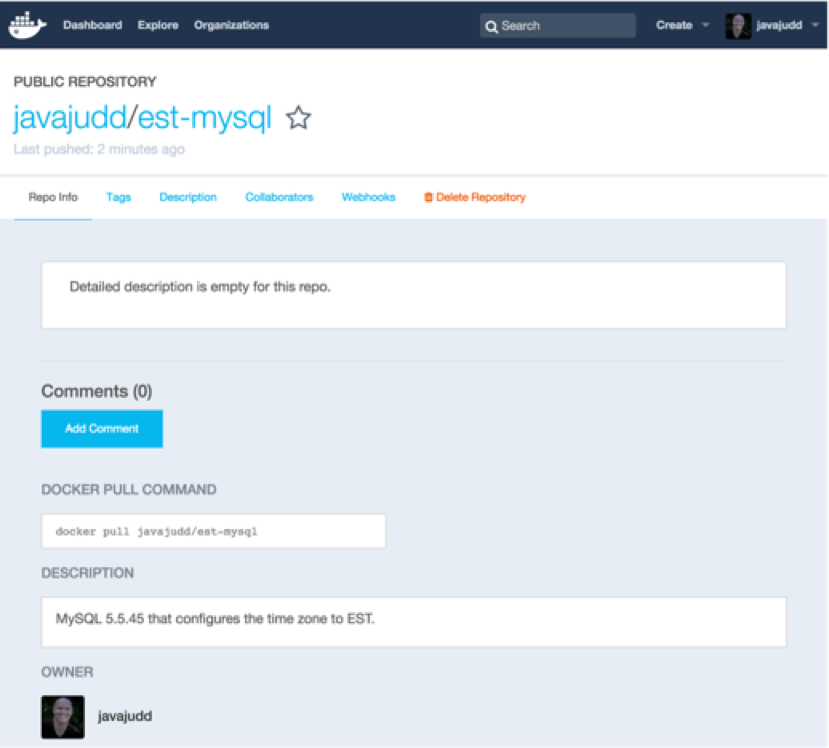
After some time, you will receive a message that the repository has been successfully pushed. If you log back into your Docker Hub account, you will see the new repository.



{{ parent.title || parent.header.title}}
{{ parent.tldr }}
{{ parent.linkDescription }}
{{ parent.urlSource.name }}