Spring Authentication With MetaMask
Learn how to develop an authentication mechanism for Spring Security with the MetaMask extension using asymmetric encryption and providing data privacy.
Join the DZone community and get the full member experience.
Join For FreeWhen choosing a user authentication method for your application, you usually have several options: develop your own system for identification, authentication, and authorization, or use a ready-made solution. A ready-made solution means that the user already has an account on an external system such as Google, Facebook, or GitHub, and you use the appropriate mechanism, most likely OAuth, to provide limited access to the user’s protected resources without transferring the username and password to it. The second option with OAuth is easier to implement, but there is a risk for your user if the user's account is blocked and the user will lose access to your site. Also, if I, as a user, want to enter a site that I do not trust, I have to provide my personal information, such as my email and full name, sacrificing my anonymity.
In this article, we’ll build an alternative login method for Spring using the MetaMask browser extension. MetaMask is a cryptocurrency wallet used to manage Ethereum assets and interact with the Ethereum blockchain. Unlike the OAuth provider, only the necessary set of data can be stored on the Ethereum network. We must take care not to store secret information in the public data, but since any wallet on the Ethereum network is in fact a cryptographic strong key pair, in which the public key determines the wallet address and the private key is never transmitted over the network and is known only by the owner, we can use asymmetric encryption to authenticate users.
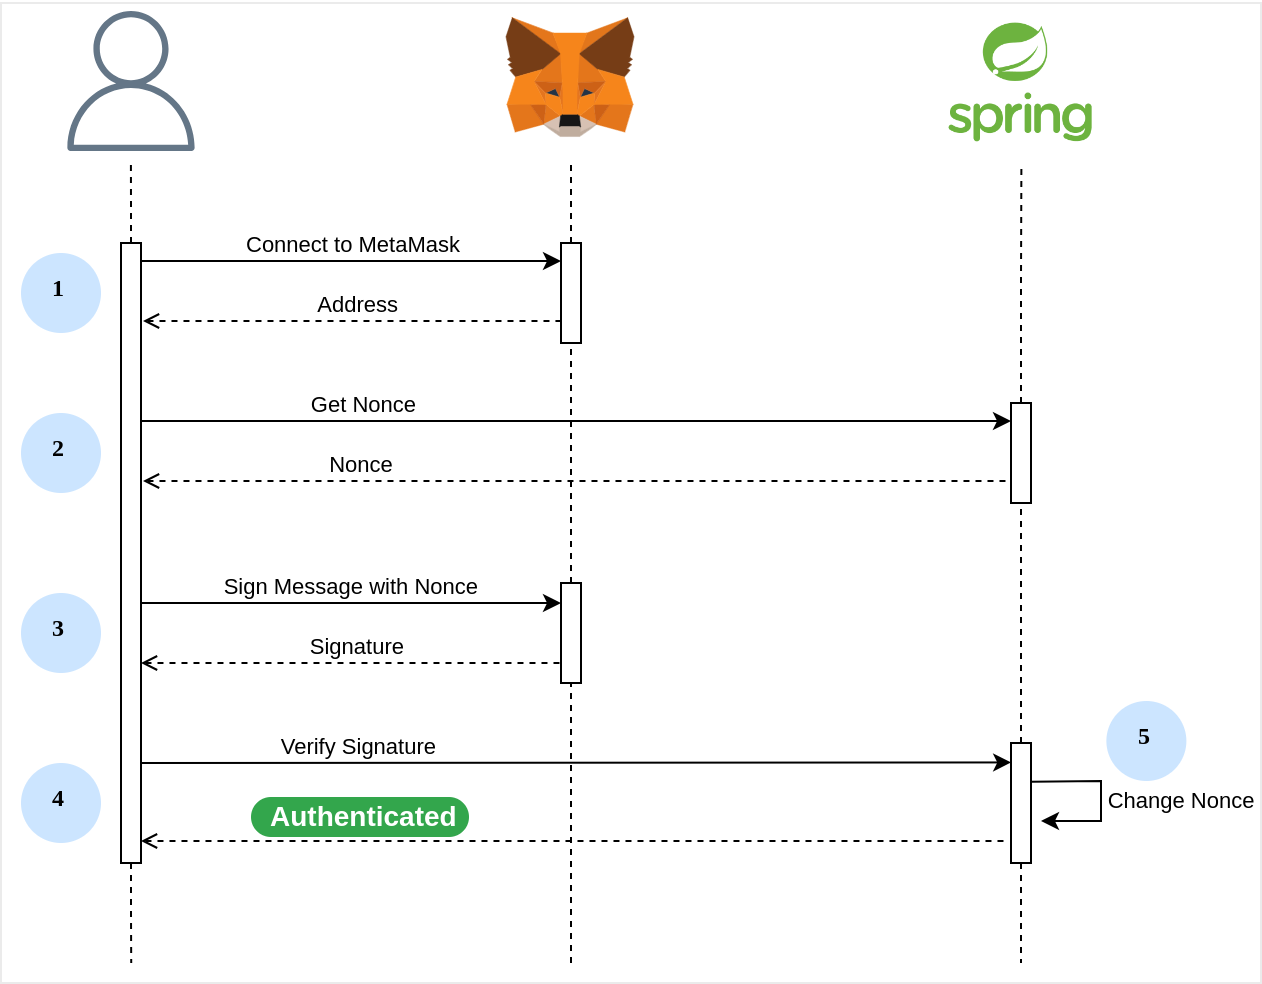
Authentication Flow

- Connect to MetaMask and receive the user’s address.
- Obtain a one-time code (nonce) for a user address.
- Sign a message containing nonce with a private key using MetaMask.
- Authenticate the user by validating the user's signature on the back end.
- Generate a new nonce to prevent your signature from being compromised.
Step 1: Project Setup
To quickly build a project, we can use Spring Initializr. Let’s add the following dependencies:
- Spring Web
- Spring Security
- Thymeleaf
- Lombok
Download the generated project and open it with a convenient IDE. In the pom.xml, we add the following dependency to verify the Ethereum signature:
<dependency>
	<groupId>org.web3j</groupId>
	<artifactId>core</artifactId>
	<version>4.10.2</version>
</dependency>
Step 2: User Model
Let’s create a simple User model containing the following fields: address and nonce. The nonce, or one-time code, is a random number we will use for authentication to ensure the uniqueness of each signed message.
public class User {
    private final String address;
    private Integer nonce;

    public User(String address) {
        this.address = address;
        this.nonce = (int) (Math.random() * 1000000);
    }

    // getters
}
To store users, for simplicity, I’ll be using an in-memory Map with a method to retrieve User by address, creating a new User instance in case the value is missing:
@Repository
public class UserRepository {
    private final Map<String, User> users = new ConcurrentHashMap<>();

    public User getUser(String address) {
        return users.computeIfAbsent(address, User::new);
    }
}
Let's define a controller allowing users to fetch nonce by their public address:
@RestController
public class NonceController {
    @Autowired
    private UserRepository userRepository;

    @GetMapping("/nonce/{address}")
    public ResponseEntity<Integer> getNonce(@PathVariable String address) {
        User user = userRepository.getUser(address);
        return ResponseEntity.ok(user.getNonce());
    }
}
Step 3: Authentication Filter
To implement a custom authentication mechanism with Spring Security, first, we need to define our AuthenticationFilter. Spring filters are designed to intercept requests for certain URLs and perform some actions. Each filter in the chain can process the request, pass it to the next filter in the chain, or not pass it, immediately sending a response to the client.
public class MetaMaskAuthenticationFilter extends AbstractAuthenticationProcessingFilter {
    protected MetaMaskAuthenticationFilter() {
        super(new AntPathRequestMatcher("/login", "POST"));
    }


    @Override
    public Authentication attemptAuthentication(HttpServletRequest request, HttpServletResponse response)
            throws AuthenticationException {
        UsernamePasswordAuthenticationToken authRequest = getAuthRequest(request);
        authRequest.setDetails(this.authenticationDetailsSource.buildDetails(request));
        return this.getAuthenticationManager().authenticate(authRequest);
    }


    private UsernamePasswordAuthenticationToken getAuthRequest(HttpServletRequest request) {
        String address = request.getParameter("address");
        String signature = request.getParameter("signature");
        return new MetaMaskAuthenticationRequest(address, signature);
    }
}
Our MetaMaskAuthenticationFilter will intercept requests with the POST "/login" pattern. In the attemptAuthentication(HttpServletRequest request, HttpServletResponse response) method, we extract address and signature parameters from the request. Next, these values are used to create an instance of MetaMaskAuthenticationRequest, which we pass as a login request to the authentication manager:
public class MetaMaskAuthenticationRequest extends UsernamePasswordAuthenticationToken {
    public MetaMaskAuthenticationRequest(String address, String signature) {
        super(address, signature);
        super.setAuthenticated(false);
    }

    public String getAddress() {
        return (String) super.getPrincipal();
    }

    public String getSignature() {
        return (String) super.getCredentials();
    }
}
Step 4: Authentication Provider
Our MetaMaskAuthenticationRequest should be processed by a custom AuthenticationProvider, where we can validate the user's signature and return a fully authenticated object. Let’s create an implementation of AbstractUserDetailsAuthenticationProvider, which is designed to work with UsernamePasswordAuthenticationToken instances:
@Component
public class MetaMaskAuthenticationProvider extends AbstractUserDetailsAuthenticationProvider {
    @Autowired
    private UserRepository userRepository;

    @Override
    protected UserDetails retrieveUser(String username, UsernamePasswordAuthenticationToken authentication)
            throws AuthenticationException {
        MetaMaskAuthenticationRequest auth = (MetaMaskAuthenticationRequest) authentication;
        User user = userRepository.getUser(auth.getAddress());
        return new MetaMaskUserDetails(auth.getAddress(), auth.getSignature(), user.getNonce());
    }

    @Override
    protected void additionalAuthenticationChecks(UserDetails userDetails, UsernamePasswordAuthenticationToken authentication)
            throws AuthenticationException {
        MetaMaskAuthenticationRequest metamaskAuthenticationRequest = (MetaMaskAuthenticationRequest) authentication;
        MetaMaskUserDetails metamaskUserDetails = (MetaMaskUserDetails) userDetails;

        if (!isSignatureValid(authentication.getCredentials().toString(),
                metamaskAuthenticationRequest.getAddress(), metamaskUserDetails.getNonce())) {
            logger.debug("Authentication failed: signature is not valid");
            throw new BadCredentialsException("Signature is not valid");
        }
    }

    ...
}
The first method, retrieveUser(String username, UsernamePasswordAuthenticationToken authentication) should load the User entity from our UserRepository and compose the UserDetails instance containing address, signature, and nonce:
public class MetaMaskUserDetails extends User {
    private final Integer nonce;

    public MetaMaskUserDetails(String address, String signature, Integer nonce) {
        super(address, signature, Collections.emptyList());
        this.nonce = nonce;
    }

    public String getAddress() {
        return getUsername();
    }

    public Integer getNonce() {
        return nonce;
    }
}
The second method, additionalAuthenticationChecks(UserDetails userDetails, UsernamePasswordAuthenticationToken authentication) will do the signature verification using the Elliptic Curve Digital Signature Algorithm (ECDSA). The idea of this algorithm is to recover the wallet address from a given message and signature. If the recovered address matches our address from MetaMaskUserDetails, then the user can be authenticated.
1. Get the message hash by adding a prefix to make the calculated signature recognizable as an Ethereum signature:
String prefix = "\u0019Ethereum Signed Message:\n" + message.length();
byte[] msgHash = Hash.sha3((prefix + message).getBytes());
2. Extract the r, s and v components from the Ethereum signature and create a SignatureData instance:
byte[] signatureBytes = Numeric.hexStringToByteArray(signature);
byte v = signatureBytes[64];
if (v < 27) {v += 27;}
byte[] r = Arrays.copyOfRange(signatureBytes, 0, 32);
byte[] s = Arrays.copyOfRange(signatureBytes, 32, 64);
Sign.SignatureData data = new Sign.SignatureData(v, r, s);
3. Using the method Sign.recoverFromSignature(), retrieve the public key from the signature:
BigInteger publicKey = Sign.signedMessageHashToKey(msgHash, sd);4. Finally, get the wallet address and compare it with the initial address:
String recoveredAddress = "0x" + Keys.getAddress(publicKey);
if (address.equalsIgnoreCase(recoveredAddress)) {
    // Signature is valid.
} else {
    // Signature is not valid.
}
There is a complete implementation of isSignatureValid(String signature, String address, Integer nonce) method with nonce:
public boolean isSignatureValid(String signature, String address, Integer nonce) {
    // Compose the message with nonce
    String message = "Signing a message to login: %s".formatted(nonce);

    // Extract the ‘r’, ‘s’ and ‘v’ components
    byte[] signatureBytes = Numeric.hexStringToByteArray(signature);
    byte v = signatureBytes[64];
    if (v < 27) {
        v += 27;
    }
    byte[] r = Arrays.copyOfRange(signatureBytes, 0, 32);
    byte[] s = Arrays.copyOfRange(signatureBytes, 32, 64);
    Sign.SignatureData data = new Sign.SignatureData(v, r, s);

    // Retrieve public key
    BigInteger publicKey;
    try {
        publicKey = Sign.signedPrefixedMessageToKey(message.getBytes(), data);
    } catch (SignatureException e) {
        logger.debug("Failed to recover public key", e);
        return false;
    }

    // Get recovered address and compare with the initial address
    String recoveredAddress = "0x" + Keys.getAddress(publicKey);
    return address.equalsIgnoreCase(recoveredAddress);
}
Step 5: Security Configuration
In the Security Configuration, besides the standard formLogin setup, we need to insert our MetaMaskAuthenticationFilter into the filter chain before the default:
@Bean
public SecurityFilterChain filterChain(HttpSecurity http, AuthenticationManager authenticationManager) throws Exception {
    return http
            .authorizeHttpRequests(customizer -> customizer
                    .requestMatchers(HttpMethod.GET, "/nonce/*").permitAll()
                    .anyRequest().authenticated())
            .formLogin(customizer -> customizer.loginPage("/login")
                    .failureUrl("/login?error=true")
                    .permitAll())
            .logout(customizer -> customizer.logoutUrl("/logout"))
            .csrf(AbstractHttpConfigurer::disable)
            .addFilterBefore(authenticationFilter(authenticationManager), UsernamePasswordAuthenticationFilter.class)
            .build();
}

private MetaMaskAuthenticationFilter authenticationFilter(AuthenticationManager authenticationManager) {
    MetaMaskAuthenticationFilter filter = new MetaMaskAuthenticationFilter();
    filter.setAuthenticationManager(authenticationManager);
    filter.setAuthenticationSuccessHandler(new MetaMaskAuthenticationSuccessHandler(userRepository));
    filter.setAuthenticationFailureHandler(new SimpleUrlAuthenticationFailureHandler("/login?error=true"));
    filter.setSecurityContextRepository(new HttpSessionSecurityContextRepository());
    return filter;
}
To prevent replay attacks in case the user’s signature gets compromised, we will create the AuthenticationSuccessHandler implementation, in which we change the user’s nonce and make the user sign the message with a new nonce next login:
public class MetaMaskAuthenticationSuccessHandler extends SimpleUrlAuthenticationSuccessHandler {
    private final UserRepository userRepository;

    public MetaMaskAuthenticationSuccessHandler(UserRepository userRepository) {
        super("/");
        this.userRepository = userRepository;
    }

    @Override
    public void onAuthenticationSuccess(HttpServletRequest request, HttpServletResponse response, Authentication authentication)
            throws ServletException, IOException {
        super.onAuthenticationSuccess(request, response, authentication);
        MetaMaskUserDetails principal = (MetaMaskUserDetails) authentication.getPrincipal();
        User user = userRepository.getUser(principal.getAddress());
        user.changeNonce();
    }
}public class User {
...
public void changeNonce() {
this.nonce = (int) (Math.random() * 1000000);
}
}
We also need to configure the AuthenticationManager bean injecting our MetaMaskAuthenticationProvider:
@Bean
public AuthenticationManager authenticationManager(List<AuthenticationProvider> authenticationProviders) {
    return new ProviderManager(authenticationProviders);
}
Step 6: Templates
@Controller
public class WebController {
    @RequestMapping("/")
    public String root() {
        return "index";
    }


    @RequestMapping("/login")
    public String login() {
        return "login";
    }
}
Our WebController contains two templates: login.html and index.html:
1. The first template will be used to authenticate with MetaMask.
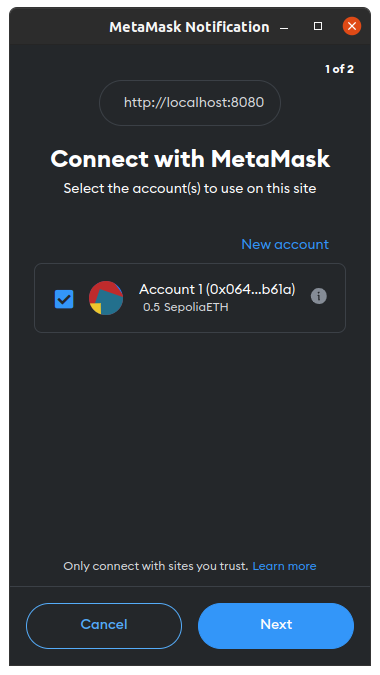
To prompt a user to connect to MetaMask and receive a wallet address, we can use the eth_requestAccounts method:
const accounts = await window.ethereum.request({method: 'eth_requestAccounts'});
const address = accounts[0];
Next, having connected the MetaMask and received the nonce from the back end, we request the MetaMask to sign a message using the personal_sign method:
const nonce = await getNonce(address);
const message = `Signing a message to login: ${nonce}`;
const signature = await window.ethereum.request({method: 'personal_sign', params: [message, address]});
Finally, we send the calculated signature with the address to the back end. There is a complete template templates/login.html:
Please sign in
Invalid signature
