Testing With Ginkgo
In this blog post, we will explore how Ginkgo addresses these testing challenges and helps Go developers write clear, expressive, and maintainable tests.
Join the DZone community and get the full member experience.
Join For FreeTesting is an indispensable part of software development, ensuring the reliability and correctness of the codebase. However, writing tests that are expressive and easy to understand can be a challenge. The Go programming language, renowned for its simplicity and efficiency, demands a testing framework that aligns with its philosophy.
This is where Ginkgo comes into play. Ginkgo is a powerful testing framework for Go, designed to facilitate Behavior Driven Development (BDD) style testing. Traditional unit testing can become cumbersome and less intuitive, especially as the codebase grows in complexity. The lack of expressive tests can hinder collaboration between developers, testers, and stakeholders, leading to misunderstandings and costly errors.
In this blog post, we will explore how Ginkgo addresses these testing challenges and helps Go developers write clear, expressive, and maintainable tests. We will cover the installation process, the benefits of using Ginkgo's BDD-style syntax, and how to organize test suites efficiently. By the end, you'll see why Ginkgo has become the go-to choice for many Go developers when it comes to testing their applications.
Let's dive in and see how Ginkgo streamlines testing and elevates the quality of Go projects.
To get started with Ginkgo, assuming you have set up a go.mod file, follow these steps in your terminal:
Install Ginkgo by running the following command:
go install github.com/onsi/ginkgo/v2/ginkgo@latest
go get github.com/onsi/gomega/...
This will fetch and install the ginkgo executable under $GOBIN — you'll want that on your $PATH. Now you will be able to run the Ginkgo version, and Ginkgo CLI will show the version number.
For example, let's consider a package called "students" to which we want to add a Ginkgo test suite. To create the Ginkgo suite file, run the command:

This will generate a file named "students_suite_test.go" within the "students" directory.
package students_test

import (
    "testing"

    . "github.com/onsi/ginkgo/v2"
    . "github.com/onsi/gomega"
)

func TestStudents(t *testing.T) {
    RegisterFailHandler(Fail)
    RunSpecs(t, "Students Suite")
}
Once you have the bootstrap file in your project, you can run your suite using the "ginkgo" command:

Next, you might want to add some specifications (specs) to your test suite. While you can directly add them to "students_suite_test.go," it is recommended to create separate files for your specs. To generate a test file, use the command:

This will create a test file named "students_test.go" within the "students" directory.
Now you can add your specs to categorize students within "students_test.go." For example:
package students_test

import (
    . "github.com/onsi/ginkgo/v2"
    . "github.com/onsi/gomega"
)

type Students struct {
    Name   string
    Year   int
    Major  string
    CGPA   float64
}

var _ = Describe("Student", func() {
    var Student1, Student2 *Students

    BeforeEach(func() {
        Student1 = &Students{
            Name:   "Alex",
            Year:  3,
            Major: “Electronics & Communication,
            CGPA: 9.4
        }

        Student2 = &Students{
            Name:   "Arjun",
            Year:    4,
            Major: "Computer Science",
            CGPA:   9.7,
        }

    })

    Describe("Categorizing students", func() {
        Context("with CGPA above 9", func() {
            It("must be a topper", func() {
                Expect(Student1.CGPA).To(BeNumerically(“>=”, 9))
            })
        })

        Context("with computer science as Major", func() {
            It("must be a Computer Science Student", func() {
                Expect(Student2.Major).To(Equal(“Computer Science))
            })
        })
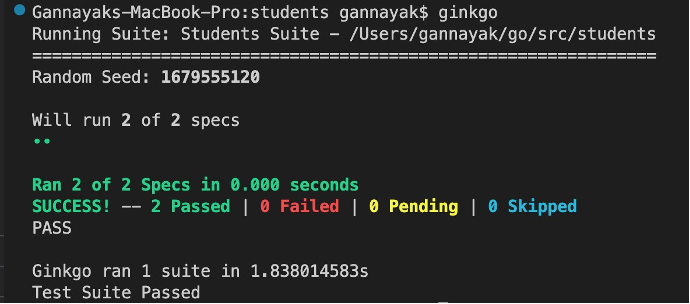
Finally, you can run your test suite using Ginkgo again to see the results:

Congratulations! You have written and executed your first Ginkgo test suite. As you continue to iterate your code, you can explore more features of Ginkgo and enhance your test suite further. Happy testing!
Opinions expressed by DZone contributors are their own.

Comments